Build railway sleeper house - 1970's style

1970's house built with railway sleepers
'The comfortable 2,200 square foot, three-bedroom house studied here took one couple, with occasional help from their friends, five summer vacations' spare time to complete. The three-hundred railway sleepers used in the walls were picked up free. Mortar material cost $300.00. This compares with a cost of $7.00 per lineal foot for stud walls with bat insulation, gypsum board, and exterior wood siding.
The house has served as the family's permanent home through ten palouse winters, the walls showing their age only in hairline wood shrinkage cracks between railway sleeper and mortar.
The railway sleepers were laid horizontally in masonry fashion. The same material serves as structure, insulation, and interior and exterior surface. The rough, unfinished, organic railway sleeper provides a mellow, rustic appearance.
Railway sleepers have an 8" X 8" section and are treated with creosote oil, a preservative derived from coal tar. The railway sleepers used should be at least ten years old. By then, enough of the creosote will have evaporated so that its smell will not be noticed. (**Please note this advice does not apply now in 2013!). Only the softwood (e.g. fir) railway sleepers should be used. Hardwood (e.g. oak) railway sleepers will shrink too much for this purpose.
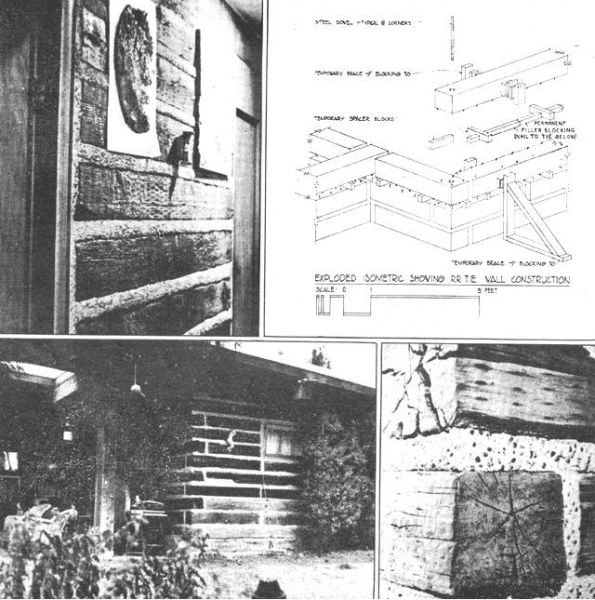
The railway sleepers were stacked with 2" spacer blocks separating them to leave joint spaces. The most uniform railway sleepers were used for interior partitions. In the exterior walls the sleepers were laid to present the best face to the inside, and that face of the wall was plumbed even, putting all irregularities to the weather. Electrical conduit runs were then made within the joint spaces.
The wall may be braced plumb by constructing vertical bracing in pairs facing each other on either side of the wall and far enough from it to allow tamping behind. The railway sleepers may be held in place with blocking to each one from the braces. Block at railway sleepers only, leaving joints free for tamping.
Corners were jointed as in block masonry with alternate beams from each wall continuing through. At each corner a steel dowel was let down through the ends of the railway sleepers, the full height of the wall. The holes receiving it may most easily be drilled as each timber is stacked.
Scrap nails were toe nailed into the top and bottom faces of each railway sleeper in two rows along both edges and at four inches on center along the length of the beam. The tops of the nails' may be bent inward to simulate hooks. Leave enough space at the edge of the railway sleepers for covering the nails with mortar. There is no chemical bond between mortar and wood. The nails mechanically bond the two after the mortar has dried.
Mortar [dry-l-part masonry cement, 1-part pea gravel, 2-parts sand and 1-part pumice (for insulation)] was then tamped into the joints. While the most tedious job, it was physically an easier one, suitable for a twelve-year old. The task can be made easier by nailing scrap filler blocks along the center of the top of each railway sleeper as it is laid. This will give something to tamp to.
When all tamping possible between two timbers has been done, the spacer blocks are removed. As the railway sleeper above settles into its permanent bed a handsome convex mortar detail will form. Mortar may then be tamped into the voids left by the spacer blocks.
Finally, the mortar surface was steel brushed while still fingerprint soft to expose the pea gravel texture. When complete, the walls were cleaned with masonry solvent.
All windows used were taken from a demolished building for $80.00 while the house was still in the planning stage. Appropriate openings were left in the railway sleeper walls, the window frames were placed, blocked to form the surrounding construction, and trimmed with mortar. The same was done at doorways.
Used railway sleepers suitable for our purpose become available only when track is relocated. Check with the roadmasters in the spring. Larger crossing timbers and bridge timbers may be used for effect (e.g. front door header) but will be more awkward to handle and place.
Railway sleeper are now commonly pulled by machines which saw them into three sections of almost 3'-length each. In this size it may be easier to lay them directly into mortar without stacking them first. Experiment!'
Thanks to these inovative builders from the 1970's
RailwaySleepers.com Says..
A house built in the 1970's of railway sleepers! Although this article was written many years ago, at a time when railway sleepers were free and there were no eco or medical concerns over the use of creosote, it is facinating to see how they constructed such a house. Indeed, such a house could still be built, although the railway sleepers would now have to be reclaimed untreated hardwoods, like Australian Jarrah or African Azobe, and I wonder whether we would still cement them together like bricks ?