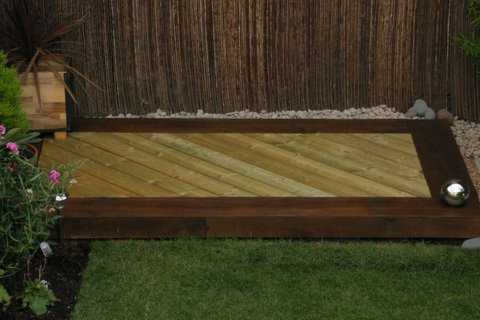
Chris & Louise's deck with new pine railway sleepers


Please find attached photo's of my recent project involving some new pine railway sleepers.
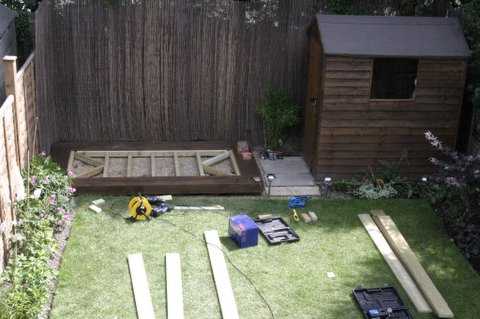
The project itself involved levelling and shifting what seemed like half a ton of earth from the back before laying a weed preventing membrane, held down with some gravel.
I then obtained some paving slabs from the nice man next door (he was laying a new patio, I got the old ones) and these, with the help of some sharp sand, was used as a base for the railway sleepers.
We used 3, 2.4m railway sleepers for with one cut in half (by hand I hasten to add!) They were then arranged in a square shape as show in the photos. I then managed to find some joists shallow and strong enough to support the decking, ensuring that the decking would sit flush with the railway sleepers. Timberlok screws were used to secure the frame together and then this was placed inside the railway sleepers and secured accordingly, using the Timberloks once again. It was then just a case of laying the decking in the diagonal style (more difficult than it looks)
A little bit of wood stain and some decking preserver later I now have a nice little deck on which I can recline in the summer.
Next project…..railway sleeper retaining wall. Can't wait!
Many thanks to you and your team for your helpful advice and also many thanks for the fast delivery of the Timberlok screws. They are indeed as good as you say they are!!
Many thanks once again.
Chris & Louise Lansdown
RAILWAY SLEEPERS USED:
New Pine railway sleepers
2400mm x 200mm x 100mm
RailwaySleepers.com Says..
Congratulations on a well planned project, and particular thanks for the photos and step by step commentary to your handywork. Indeed, now you've created an inviting reclining corner, I doubt if you'll ever get round to your next project - the retaining wall!